How to Calibrate a Food Thermometer for Plate Sales
Build a reliable food-thermometer routine with an ice-water accuracy check, correct probe placement, clear actions, cleaning, and a simple log.
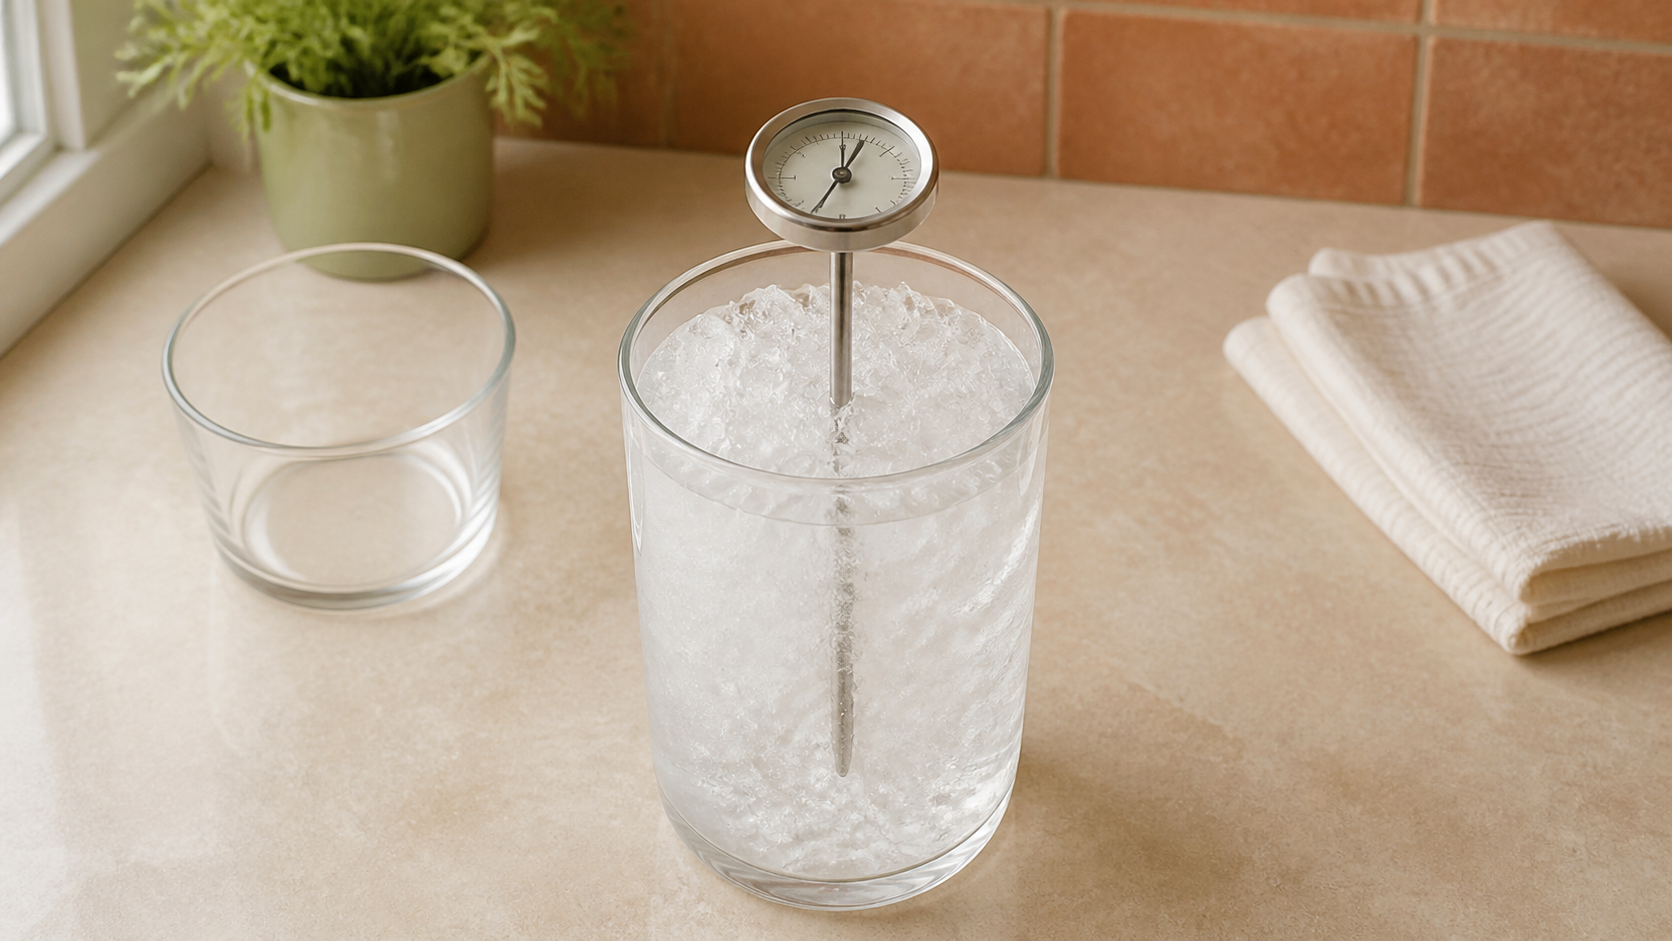
A temperature written on a production log looks precise, but it can still be wrong. The thermometer may have drifted after a drop, the sensing area may not be fully inside the food, or the probe may be touching a pan instead of measuring the plate.
This guide will help you build a repeatable thermometer routine for a small plates business. You will identify how your device works, run an ice-water accuracy check, decide what to do with a bad result, place the probe correctly, and keep a short record before you rely on the thermometer for cooking, holding, cooling, or reheating.
Food-business requirements differ by product and jurisdiction. Confirm the thermometer standard, check frequency, sanitation procedure, and temperature rules that apply to your operation with your state or local regulator.
Treat checking and adjusting as two different actions
People often use “calibrate” to describe the whole process, but two actions are involved:
- Checking accuracy compares the thermometer’s reading with a known reference point.
- Adjusting changes an adjustable instrument so it reads that reference correctly.
Some dial thermometers have a calibration nut. Many digital models can be checked but cannot be adjusted by the user. The USDA food-thermometer guide advises following the manufacturer’s instructions and notes that an inaccurate nonadjustable device may need to be replaced.
Give every thermometer a simple identifier, such as T1 or T2, and keep its instructions. Record its range, sensing area, insertion depth, response time, adjustment method, and whether it can stay in food during cooking. A dial stem and a tip-sensitive digital probe do not measure in the same place.
Do not use a glass-stem household thermometer unless it is specifically suitable and protected for the task. The FDA model Food Code restricts glass sensors or stems unless they have a shatterproof coating, because broken glass can become a physical hazard.
Prepare the ice-water reference correctly
An ice-point check is useful because a properly prepared mixture gives you a stable 32°F reference without the elevation and burn concerns of boiling water.
Set up the check this way:
- Fill a large clean glass to the top with crushed ice or small ice pieces.
- Add clean drinking water until it fills the spaces between the ice. Do not turn the glass into mostly water with a few floating cubes.
- Stir the mixture well and let the temperature settle.
- Insert the thermometer’s complete sensing area into the center of the mixture. For a typical dial stem, that usually means at least two inches.
- Keep the stem away from the glass sides and bottom, which can affect the reading.
- Wait at least 30 seconds, or the time specified by the manufacturer, without removing the probe.
- Read and record the result while the sensing area remains in the mixture.
USDA describes this ice-water method and a 32°F target. The University of Minnesota Extension accuracy check independently uses crushed ice, water, a two-inch dial-stem depth, a 30-second wait, and the same target.
If the ice melts down during the check, add more ice and stir again. If the probe touches the glass or the mixture is mostly water, reset the test instead of treating the result as evidence that the thermometer is wrong.
Decide what a failed check means
Write the observed reading before making an adjustment. That “before” number shows whether the device changed and keeps you from turning a failed check into an invisible correction.
The current FDA model Food Code accuracy section specifies that Fahrenheit-only food thermometers be accurate to ±2°F in their intended range of use. It also says food temperature devices should be calibrated according to manufacturer specifications as necessary to ensure accuracy. The Food Code is a model for jurisdictions, not a rule that applies identically to every home-food seller, so use the requirement adopted by your regulator when it differs.
Then take the action that matches your device and rules:
- Adjustable dial: Keep the sensing area in the ice mixture, hold the calibration nut with the correct tool, turn the dial head to 32°F, and repeat the full check.
- Adjustable digital: Use only the manufacturer’s documented calibration mode, then retest.
- Nonadjustable digital: Follow the manufacturer and regulator’s instructions. If the result is outside the permitted tolerance, remove the device from food-safety use and replace or professionally service it.
- Unstable or damaged device: Stop using it if the reading jumps, the display fails, the probe is bent, the housing is cracked, or moisture has entered a unit that is not waterproof.
Do not simply add or subtract a remembered correction every time you cook unless your approved procedure explicitly allows that method. A sticky note saying “reads four degrees low” can be lost, misunderstood, or applied to the wrong thermometer.
Check on a schedule and after a shock
There is no single check frequency that fits every instrument and operation. Follow the device instructions and your regulator’s requirement. For a small weekly seller, checking before a sale day is a conservative routine that keeps the decision close to the food records it affects.
Check again after an event that could change the reading: the thermometer was dropped, twisted, exposed to temperature outside its design range, stored wet, struck against equipment, or returned from repair. Penn State Extension’s thermometer calibration guidance specifically calls out regular checks and checks after a device is dropped or twisted.
A CDC restaurant study found that among restaurants using thermometers, about one in three managers said accuracy was checked less than once a month. That does not set your schedule, but it shows why owning a thermometer is not the same as managing it.
Keep one verified backup available if temperature checks are critical to the service. A backup prevents a damaged device from pressuring you to guess, skip a checkpoint, or keep using a thermometer that failed.
Put the sensing area in the food, not near it
A thermometer can pass the ice test and still give a bad food reading when it is placed incorrectly. Read the instructions so you know where the sensor sits. A dial stem may sense along a longer section near its dimple; a digital probe may sense close to the tip.
For thick food, place the complete sensing area in the thickest relevant part, away from bone, large pockets of fat, and the pan. For a thin chicken cutlet, burger, fish fillet, or shallow portion, insert a suitable small-diameter probe from the side so the sensor reaches the center. USDA also recommends checking large or irregular food in more than one location because pieces and zones can heat differently.
Measure the food itself. An air display does not prove the internal temperature of a dense tray. When checking a pot or pan, stir only when the approved process permits it, then sample the slowest-heating or slowest-cooling area without resting the probe against metal.
Connect the reading to a batch and a decision. The workflow for keeping plates hot through pickup and delivery explains where representative holding checks fit. The guide to cooling cooked food for advance orders shows why an early internal checkpoint matters when a batch is moving through a cooling limit.
Clean, sanitize, and store the probe safely
The thermometer is a food-contact tool. A probe used in raw chicken cannot move directly into a cooked portion or ready-to-eat side. Clean it after each use with hot soapy water or the method specified by its manufacturer, then sanitize it according to the food-contact procedure and product directions required for your operation.
Protect the display and electrical housing from immersion unless the device is rated for it. Do not wipe a clean probe with a used kitchen cloth. If the probe touches an unclean surface or storage sheath, repeat the cleaning and sanitizing process before it touches food.
Store the dry thermometer securely with its probe protected. Penn State notes that a broken thermometer can become a physical hazard, while USDA recommends using the stem sheath and protecting delicate instruments from rough handling.
Keep a one-line accuracy record
Your accuracy log does not need to be complicated. Use one line per device and check:
| Date and time | Device ID | Method and target | Reading before | Action | Reading after | Initials |
|---|---|---|---|---|---|---|
| Aug. 6, pre-service | T1 | Ice water, 32°F | 35°F | Adjusted per instructions | 32°F | AB |
That row is an example, not proof that every three-degree difference may be corrected in every jurisdiction. Your adopted accuracy limit and manufacturer instructions control the decision. If a device fails, note that it was removed, replaced, or sent for service; do not erase the failed reading.
Keep the accuracy record near the production logs that rely on the instrument. If a thermometer later fails badly, those records help you identify which batches and decisions may need review. Pair the device ID with each important cooking, reheating, holding, or cooling entry so you know which tool produced the number.
Run a six-point check before the next sale
Before relying on a thermometer, confirm:
- Permission: You know the thermometer and temperature rules adopted for your product and jurisdiction.
- Identity: The device has an ID, instructions, intended range, and known sensing area.
- Accuracy: A correctly prepared ice-water check produced an acceptable reading.
- Action: An inaccurate, unstable, or damaged instrument was adjusted, serviced, replaced, or removed.
- Placement: The sensor reaches the correct part of the food without touching the container.
- Hygiene: The probe is cleaned, sanitized, dried, and stored without recontamination.
Start with the thermometer you use most. Find its instructions, prepare a glass packed with ice and water, run the check, and write down what happens. Once you can trust both the device and the way it is placed, the temperature records behind your standardized production recipes become much more useful. The Selling Plates guide can then help you connect that control to the wider menu, pricing, ordering, and sale-day plan.
Ready to move?
Turn the research phase into your first sale.
The guide brings pricing, menu planning, marketing, and setup into one clear playbook.
Get the guide on Gumroad